The rush to submit visionOS apps has already started. Apple Vision Pro, powered by the visionOS platform, is opening new possibilities for spatial computing. Developers now have the tools to build immersive 3D experiences that blend seamlessly with the real world, from interactive fitness programs to hands-on educational apps.
Despite growing interest, the App Store is seeing a shift in developer activity. In November 2023, over 26,000 new apps and 3,381 games were submitted. This is significantly lower than the monthly peak of 42,500 new apps recorded in 2019, says Statista.
The declining volume gives developers an advantage and less saturation, but higher expectations for quality and usability.
Launching a visionOS app successfully requires more than writing code. Development teams must follow Apple’s submission standards carefully and understand the complete review process.
This guide outlines how to submit visionOS apps to the App Store correctly, including preparation, Xcode configuration, and best practices for approval. Following this roadmap can improve visibility, reduce rejection risks, and ensure a smoother path to launch.
What Are the Requirements Before You Submit visionOS Apps to the App Store?
Before submitting a visionOS app, development teams must meet specific technical, legal, and platform-related requirements. Apple does not accept apps that fail to meet these conditions, even if the app is functional. As Apple Vision Pro trends continue to evolve, staying aligned with the latest submission standards becomes even more critical. The checklist below outlines everything required to properly submit visionOS apps to the App Store.

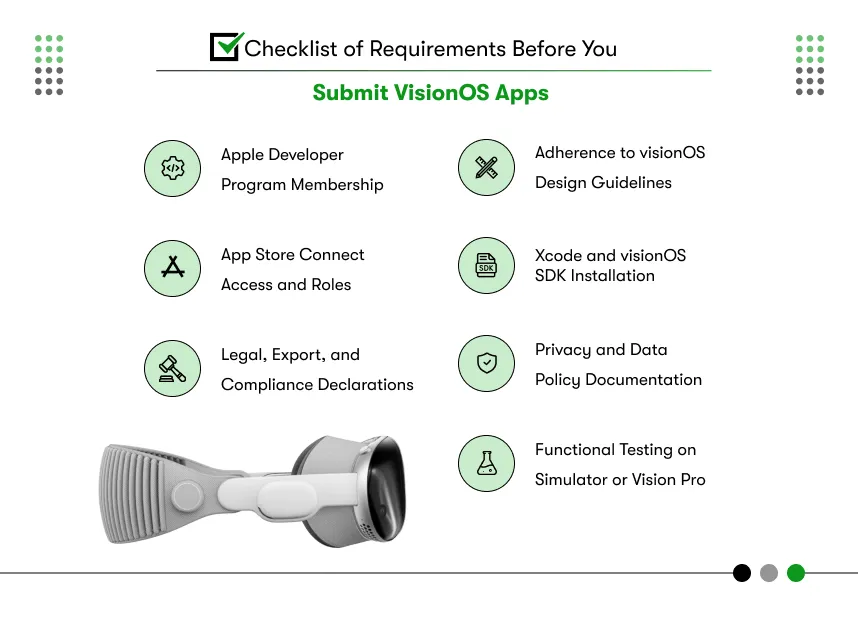
1. Apple Developer Program Membership
Only members of the Apple Developer Program can submit apps to the App Store. This membership grants access to visionOS SDKs, TestFlight, and App Store Connect.
To complete this step:
- Sign in at developer.apple.com.
- Register as an individual or organization.
- Submit company D‑U‑N‑S number and legal entity info (for organizations).
- Pay the $99 annual fee.
This account is mandatory to submit visionOS apps for Vision Pro.
2. Xcode and visionOS SDK Installation
Apple requires visionOS apps to be built and archived using the latest version of Xcode with the visionOS SDK.
Preparation steps include:
- Install the latest version of macOS.
- Download Xcode with visionOS SDK from Apple’s official source.
- Configure a new project using the correct visionOS templates.
Without this setup, teams cannot complete the process to submit apps to the Vision Pro App Store.
3. App Store Connect Access and Roles
App Store Connect is Apple’s platform for managing app listings, builds, and submission workflows.
Ensure the following:
- Access to App Store Connect is enabled.
- Developer roles such as Admin, App Manager, or Developer are assigned.
- A valid Bundle ID is created in your account.
Access to this system is essential to submit visionOS apps to the App Store and manage post-submission steps.
4. Adherence to visionOS Design Guidelines
Apple reviews all visionOS apps based on strict Human Interface Guidelines (HIG). The app must provide a native experience designed for spatial computing.
Make sure to:
- Use Shared Space or Full Space design layouts properly.
- Integrate spatial audio, gaze tracking, and gesture input.
- Avoid cluttered or blocked visuals that affect immersion.
Following these design rules increases approval chances and aligns with Apple’s review criteria on how to submit apps to Vision Pro App Store.
5. Functional Testing on Simulator or Vision Pro
Before submission, developers must test the app thoroughly on Apple’s Vision Pro simulator or actual hardware.
Key requirements:
- Validate core interactions such as gesture, gaze, and navigation.
- Monitor memory usage and performance.
- Fix crashes, bugs, or animation glitches.
Unstable builds do not pass Apple’s review process, regardless of functionality. Stable testing ensures readiness to submit apps to the Vision Pro app store.
6. Privacy and Data Policy Documentation
Every app must provide a privacy policy and answer Apple’s privacy questionnaires. Failing to declare how user data is used may result in immediate rejection.
What to prepare:
- Publicly hosted privacy policy URL.
- Data collection and usage declarations.
- Disclosure of use of camera, microphone, or tracking services.
Apple uses this information to verify compliance before you submit visionOS apps to the App Store.
7. Legal, Export, and Compliance Declarations
Apple also checks whether the app meets legal and export requirements. Developers must complete all declarations and provide accurate metadata.
What to cover:
- Encryption usage (e.g., secure data transfer or SSL).
- Export compliance details (for international distribution).
- Content age rating based on Apple’s standards.
- Licensing information for third-party SDKs and media.
Providing complete legal information shortens the review timeline and ensures your team is eligible to submit visionOS apps without delays.
Completing these requirements helps avoid last-minute blockers, reduces rejection risks, and streamlines the review process. Once every step on this list is finished, your development team is ready to submit visionOS apps to the App Store confidently and professionally. Whether you’re building from scratch or planning to convert app to visionOS, this checklist ensures that your submission meets Apple’s expectations from day one.
If you’re finding it difficult to submit your visionOS app on your own, you can hire a developer, learn how in our blog How to Hire visionOS Developers.
What Happens After You Submit visionOS Apps to the App Store?
Once a team completes the submission process, the app enters Apple’s formal review pipeline. This post-submission phase is critical for final approval, and it requires careful monitoring, documentation, and timely responses. Developers who understand how this process works can reduce rejection rates and launch apps faster on the Vision Pro App Store.
The following steps explain exactly what happens after you submit visionOS apps to the App Store, along with what developers must do to move the app forward.

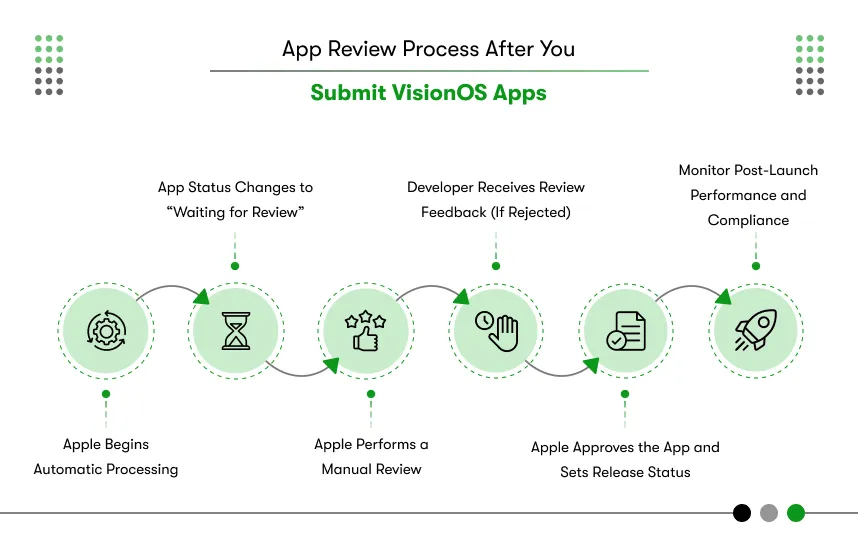
1. Apple Begins Automatic Processing
After uploading the app through Xcode and linking the build in App Store Connect, Apple automatically processes the archive.
This includes:
- Validating entitlements, provisioning profiles, and SDK versions.
- Scanning for missing information in the metadata, privacy forms, or content rights.
- Checking basic app structure for version control and signature mismatches.
If Apple detects errors, the processing will fail, and App Store Connect will display a red “Invalid Binary” or “Missing Compliance” alert. Developers must resolve these issues before the review begins. Until the processing completes successfully, the app is not eligible for review. These strict compliance checks highlight the difference between Vision Pro vs other XR platforms, where Apple’s ecosystem demands a higher level of precision and documentation for approval.
2. App Status Changes to “Waiting for Review”
After successful processing, the app status in App Store Connect will change to “Waiting for Review.” This means the submission is now in the queue for Apple’s human App Review team.
At this stage:
- Apple assigns the app to a reviewer based on app type and region.
- The reviewer evaluates the app against Apple’s App Store Review Guidelines, including UI, functionality, security, and content compliance.
- Apple may also run the app on real Vision Pro hardware to validate the immersive and spatial computing experience.
During this time, the team should not make changes to the metadata or build unless instructed to do so. Any major change will reset the review queue.
3. Apple Performs a Manual Review
When the app reaches the front of the queue, Apple’s reviewer begins the manual review process. The reviewer interacts with the app and assesses its readiness for public release.
Key checkpoints include:
- Does the app follow visionOS design guidelines?
- Are all gestures, gaze, and spatial controls functional?
- Does the app crash or slow down under normal use?
- Are data disclosures, privacy forms, and legal responses accurate?
If the app passes all requirements, the status will change to “Ready for Sale.” If there are issues, Apple will provide detailed feedback in the Resolution Center.
4. Developer Receives Review Feedback (If Rejected)
If Apple rejects the submission, the reviewer will leave comments in the Resolution Center within App Store Connect. These comments may include screenshots, error logs, or explanations related to the rejection.
Common reasons for rejection include:
- Incomplete or misleading metadata.
- Crashes or performance bugs during runtime.
- Incorrect use of permissions (e.g., camera, microphone).
- Poor UI behavior in Shared Space or Full Space layouts.
At this point, the development team must:
- Carefully read and understand Apple’s notes.
- Make the required changes to the app or listing.
- Rebuild and resubmit the app using the correct version number.
Addressing rejections quickly shows responsiveness and reduces the risk of additional delays.
5. Apple Approves the App and Sets Release Status
Once Apple approves the app, the status changes to “Ready for Sale.” At this point, developers can either launch the app immediately or choose a scheduled release date.
To complete this step:
- Go to App Store Connect > My Apps > Version > Release.
- Select “Manual release” or “Automatically release after approval.”
- Click “Release This Version.”
Apple will then publish the app to the Vision Pro App Store, making it discoverable to all users based on the regions, categories, and devices selected.
6. Monitor Post-Launch Performance and Compliance
After release, developers must continue monitoring the app to ensure performance, user safety, and compliance with Apple’s policies. Any serious issues or crashes may lead to the app being pulled from the store.
Best practices include:
- Track crashes and analytics using Xcode, Firebase, or third-party tools.
- Respond to App Store reviews and user feedback.
- Keep privacy disclosures updated with new app versions.
- Submit regular updates to improve performance and user experience.
Continual improvement not only helps retain users but also increases your chances of being featured by Apple.
Submitting an app is only the midpoint in the journey. The post-submission phase determines whether the app makes it to the Vision Pro App Store successfully. Teams that prepare for review, monitor status, and respond quickly to Apple’s feedback complete the cycle faster and with fewer issues.
As Vision Pro use cases expand across industries like education, fitness, retail, and healthcare, the expectations for submission quality continue to rise, making review readiness more critical than ever.
Understanding exactly what happens after you submit visionOS apps to the App Store gives your team a strategic advantage and reduces costly delays.

Tips to Avoid Rejection When You Submit visionOS Apps
Submitting a visionOS app to the App Store is only part of the journey. Earning approval from Apple’s review team requires precision, quality control, and adherence to platform standards. Even minor oversights in design, functionality, or documentation can lead to rejection and costly delays.
This section outlines practical, applicable tips to help developers avoid the most common reasons for rejection when they submit visionOS apps to the App Store. Each tip is based on Apple’s official guidelines, real-world submission behavior, and industry best practices.
1. Follow Apple’s Human Interface Guidelines for visionOS
Many apps are rejected because they fail to meet the core interaction standards defined in Apple’s Human Interface Guidelines (HIG) for visionOS.
To reduce this risk:
- Use proper spatial layouts: design for Shared Space or Full Space, not flat iPad-style screens.
- Implement native input systems: use hand gestures, gaze, or eye tracking properly.
- Ensure UI legibility: do not place buttons or text too far or too close in the 3D scene.
- Avoid cluttered or floating elements that disorient users.
Apple expects immersive, intuitive, and purpose-driven experiences. Any app that feels like a 2D port will struggle to pass review.
2. Provide Accurate and Complete App Metadata
Your app’s listing must match the actual functionality and experience offered in the app. Apple reviews all submitted materials against in-app content.
Before you submit visionOS apps to the App Store, make sure:
- App name and description are accurate and not misleading.
- All keywords are relevant and avoid spam tactics.
- Screenshots reflect real usage from the Vision Pro experience.
- The privacy policy URL is valid, public, and written in clear language.
Even accidental misrepresentation can result in immediate rejection.
3. Test the App End-to-End in a Realistic Vision Pro Environment
Bugs, crashes, lag, or poor user flow are some of the most frequent rejection reasons. Functional stability must be confirmed before attempting submission.
Checklist before upload:
- Launch the app on the Vision Pro simulator and complete a full user session.
- Ensure all gestures, interactions, and navigation transitions work without delay.
- Monitor memory usage and responsiveness with Xcode debug tools.
- Run at least one TestFlight session with internal testers to detect edge-case issues.
Apps that crash or freeze during Apple’s manual review will not be approved.

4. Complete Every Compliance and Legal Field in App Store Connect
Apple treats incomplete documentation as a serious compliance risk. If any part of your app touches user data, location, camera, microphone, or sensors, Apple expects full transparency.
Make sure to:
- Complete Apple’s privacy questionnaire in App Store Connect without skipping any fields.
- Disclose all third-party SDKs or tracking libraries.
- Select the correct age rating and territory availability.
- Accurately answer encryption and export compliance questions.
This step directly affects whether your app qualifies for review. Many developers unknowingly delay their launch due to skipped answers.
5. Use Unique Bundle IDs and Proper Version Control
Technical inconsistencies between the uploaded build and your metadata can also trigger a rejection.
Before you submit apps to the Vision Pro App Store, confirm:
- The Bundle Identifier in Xcode matches the one registered in App Store Connect.
- The version number and build number are updated correctly.
- The provisioning profile and signing certificate are active and valid.
- You have not reused a build already rejected without making changes.
Apple’s backend tools cross-verify these fields automatically. Mismatches will block submission or result in processing errors.
6. Avoid Submitting Too Early, Use TestFlight First
TestFlight allows you to beta test your visionOS app before final submission. Using it helps catch issues you may miss during internal QA.
How to use TestFlight:
- Upload the build to App Store Connect and mark it as a TestFlight release.
- Invite internal team members or external testers.
- Collect feedback on performance, usability, and functionality.
- Fix bugs, optimize transitions, and retest before submitting to the App Store.
Submitting early without real-world testing increases the risk of rework and approval delays. Approval depends on preparation, technical discipline, and attention to detail. Apple’s review process protects users and highlights the best of Vision Pro. Developers who align with expectations avoid rejection and launch faster. Before you submit visionOS apps, remember that missed details can raise your VisionOS app development cost. Treat your build, listing, and compliance as one unified product.
How to create your product page for submitting apps to the Vision Pro App Store?
The visionOS App Store is a growing marketplace where users discover exciting new Apple Vision Pro apps. Your app’s product page is its prime real estate, the first impression that grabs users’ attention and convinces them to download.

When you’re creating your app’s product page, follow section 2.3 of the App Review Guidelines and ensure you describe your app experience accurately to users. Keep in mind that you’re responsible for getting the rights to all the content you use. Also, any account info or user data shown on the page should be made up, not real.
Creating a product page includes many aspects that are important to Submit visionOS apps to the App Store.

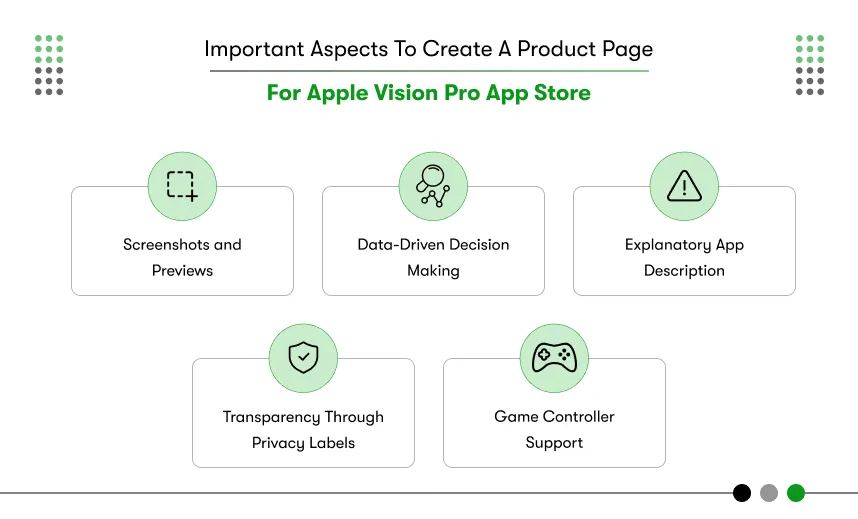
Screenshots and Previews
High-quality screenshots and app previews are fundamental to effectively communicating your app’s user experience to potential customers on the VisionOS App Store
Here’s how to ensure high-quality screenshots are available for the app store.
Quality First:
- Use Developer Capture in Reality Composer Pro for pristine captures (avoid screen recordings, they look blurry).
- Keep your head steady during capture (think seated with stable hands).
Showcase Functionality:
- Focus on clear visuals that represent your app’s core features. No distractions!
- If your app uses hand gestures, show them interacting with the app (but keep them clear of important features).
Setting the Scene:
- Ideally, depict your app within a user’s surroundings (unless it’s fully virtual). This highlights the app’s use of passthrough.
- Keep your capture environment clutter-free and free of sensitive content.
Alternative Capture Methods:
- If passthrough capture isn’t ideal, consider a system Environment. However, simulated capture (explained below) often works better.
- Simulated captures are okay if they accurately represent your app. Use Apple Design Templates or the Simulator (remember to resize for upload).
Resources:
- Capturing Screenshots & Video from Apple Vision Pro for 2D Viewing
- Capturing Screenshots & Videos from the Simulator
Do’s and Don’ts:
- Do: Keep the app window straight, capture clear images, and use uncluttered surroundings.
- Don’t: Tilt the window, capture clutter, or use blurry captures.
App Icon Design
Your app icon acts as your calling card on the VisionOS App Store. It’s the first thing users see, so make it count! Here’s a quick rundown:
- VisionOS Icons: These are circular 3D icons made of up to three layers, creating a cool depth effect.
- Compatible App Icons: If you already have an iPadOS or iOS app, its icon will automatically appear as a square with rounded corners on VisionOS.
- Design Inspiration: To create a rocking icon that pops on VisionOS, head over to the Human Interface Guidelines for some design tips and tricks.
Explanatory App Description
Your app’s name, subtitle, and description work together like a dream team to tell users what your app does and why it’s awesome. Here’s a quick rundown:
- App Name (up to 30 characters): Keep your app’s function short, catchy, and descriptive.
- Subtitle (up to 30 characters): Summarize your app’s core value and benefits in a quick, attention-grabbing phrase.
- Description: Write a clear, concise paragraph followed by a bulleted list of key features. Focus on what makes your app special, especially regarding visionOS features.
Here are some style tips to remember:
- Apple Vision Pro: Always use three capitalized words (Apple Vision Pro) and avoid using “the” before it.
- visionOS: Starts with a lowercase “v” even at the beginning of a sentence.
- Spatial Computing: Describe your app as “spatial computing” instead of AR, VR, XR, or MR.
- App Store: Use uppercase “A” and “S.” Refer to it as “the App Store” unless specifying “App Store for Apple Vision Pro”.
- Languages: Keep “visionOS,” “Apple Vision Pro,” and “App Store” in English, even in translated descriptions.
Transparency Through Privacy Labels
The App Store Connect now has unique privacy labels for visionOS apps. These labels explain how your app uses the environment and body movements (hands and head).
Here’s the gist:
- Be upfront about how your app interacts with surroundings (scanning the environment) and body movements (hands and head).
- Include how any third-party code you use handles privacy as well.
This info goes into your app’s privacy label on the App Store, so users know exactly what data your app uses. It’s required to submit new apps and updates, so be sure to fill it out!
Game Controller Support
Apple Vision Pro can handle two touches simultaneously (like taps). This means some games designed for iPad and iPhone might need a game controller for the best playing experience.
If your game falls into this category, you can add a “Requires Game Controller” badge to your product page. This lets users know they’ll need a controller to enjoy your game truly. Just use the magic key “GCRequiresControllerUserInteraction” to make it happen!
Hit Submit and Let the App Store Adventure Begin!
Once your product page is polished and everything looks amazing, it’s time to submit your app! Head over to App Store Connect to get the process rolling. This is where you’ll officially submit your app for review and manage its availability on the store.
Don’t forget to consult the App Review Guidelines. They’re like the App Store’s rulebook, especially important during any Vision Pro app development process. Be sure to give them a good read-through. Following them will help your app sail smoothly through the review process. Once your app gets the green light from the reviewers, it’ll be published on the App Store based on your chosen date. Pretty exciting, right?
Embrace the future of Spatial Computing by launching your VisionOS app!
From compatibility checks to crafting a captivating product page, you now have a roadmap for a successful launch on the App Store. However, as you delve deeper into the exciting world of spatial computing, you might encounter challenges or require specialized expertise. This is where a trusted VisionOS app development company can become your invaluable partner.
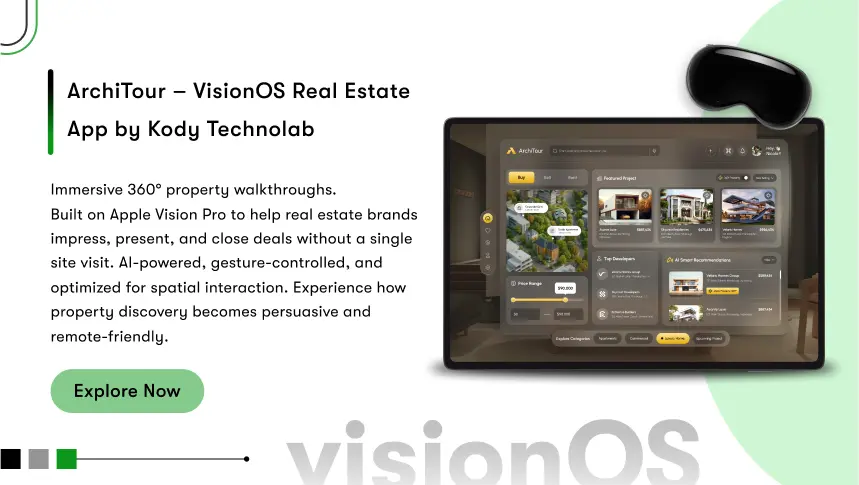
Kody Technolab, a leading VisionOS app development company, boasts a team of passionate and highly skilled VisionOS app developers. We possess the experience and technical know-how to transform your visionOS app ideas into groundbreaking realities.
Whether you require assistance with optimizing your app for visionOS, crafting an immersive user experience, or ensuring a seamless App Store launch, Kody Technolab is here to empower you.