As an innovator, you must be no stranger to the ever-changing demands of software development. That new feature request, coming out of thin air from your users, can be both exhilarating and daunting. The pressure is on to deliver high-quality code quickly while ensuring that everything works seamlessly across different devices and platforms.
The last thing you want is for bugs to creep in, causing crashes and frustrating users. Right?
This is where CI/CD (Continuous Integration and Continuous Deployment) comes armed to assist you in your quest for smooth development and deployment.
Basically, CI/CD is a set of practices that automates the integration of code changes, runs tests, and deploys your application to production swiftly and reliably.
That being said, days when you manually build, test, and deploy your Flutter apps, are a thing of the past. Because with Flutter CI/CD Integration, you can automate these processes, ensuring that each code change is thoroughly tested and deployed smoothly.
Jenkins is one of the renowned CI/CD tools, letting you integrate continuous delivery pipelines. Now, you must be excited to learn about how to build a CI/CD pipeline in Jenkins, specifically for CI/CD Integration using Flutter Jenkins.
So, we will explore Flutter CI/CD Jenkins integration and provide you with a script to build a pipeline for Android and iOS apps.
But let’s strengthen our foundation for Flutter CI/CD Jenkins first. Shall we?
What do you mean by CI/CD?
Imagine a world where, instead of anxiously sweating over each line of code, you can let your Flutter developers focus on creating magic with Flutter– with confidence that their changes won’t cause any regressions.
CI/CD allows you to catch issues early in the development cycle, making bug hunting more manageable and preventing last-minute surprises. With its help, you can easily release new features and updates, delivering value to your users faster than ever before.
But wait, there’s more to CI/CD benefits!
CI/CD doesn’t just benefit you as a developer—it also brings numerous advantages to your entire team.
- Collaboration becomes smoother as everyone’s code is integrated regularly.
- Reduce conflicts and ensure that your app remains stable and functional.
- The ability to deploy changes automatically allows your team to rapidly respond to customer feedback, fix issues, and deliver improvements in record time.
What is the best CI/CD for Flutter?
Jenkins is not the only CI/CD tool, of course. But when it comes to choosing the best CI/CD tool for Flutter development, Jenkins stands tall among the crowd.
Its flexibility, extensive plugin ecosystem, and robust support make it an excellent choice for automating Flutter workflows.
However, other popular options as the following, also offer solid Flutter CI/CD integration. You can consider them based on your specific needs and preferences.
- Travis CI
- CircleCI
- GitLab CI/CD
- Codemagic
So many CI/CD tools exist. But why do we recommend Jenkins for Flutter? Let’s plunge right into the reasons!
Why use Jenkins for Flutter CI/CD Integration?
Jenkins excels at many crucial areas of app development, making it a good choice for your Flutter app. For example,
Flexibility: Jenkins provides a high level of flexibility in configuring your CI/CD pipelines for Flutter. You can easily incorporate Flutter tools like Flutter SDK and Flutter test frameworks like Flutter Driver or Mockito.
For example, you can set up a pipeline (we’ll show how) to build and test your Flutter app on multiple devices and platforms, ensuring compatibility and functionality.
Open Source and Community Support: Being open-source, Jenkins has a vibrant community of developers contributing to plugins, updates, and best practices. This ensures continuous support and keeps Jenkins up-to-date with the latest Flutter developments.
Scalability and Reliability: Jenkins is highly scalable, accommodating projects of various sizes. As your Flutter project grows, you can easily expand your Jenkins build infrastructure by adding more build agents or distributing the workload across multiple machines. This ensures reliable and efficient CI/CD processes even in large-scale projects.
Integration with Version Control Systems: The CI/CD tool seamlessly integrates with popular version control systems, including Git. Thus, enabling the automatic triggering of builds and deployments based on code changes.
For example, every time you push code changes to a Git repository, Jenkins can automatically build and test your Flutter app, giving you quick feedback on the code quality.
Extensive Plugin Ecosystem: Jenkins also offers a suite of plugins that enhance your Flutter CI/CD pipeline. These plugins cover various aspects, such as code analysis, code coverage, and deployment to app stores or cloud platforms.
For instance, you can use the Flutter Build plugin to automate the building and packaging of your Flutter app for different platforms, ensuring efficient and consistent deployment.
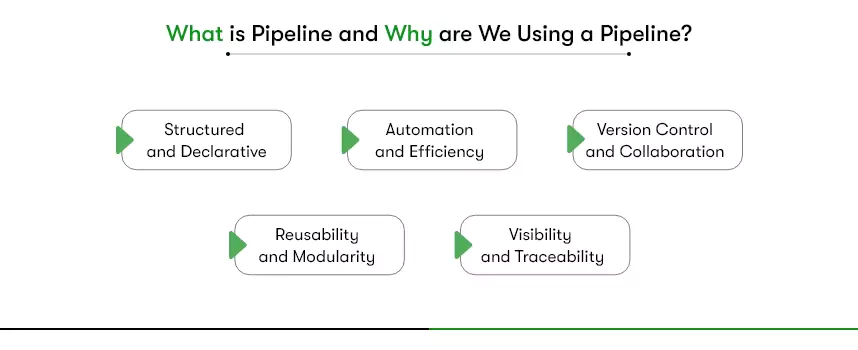
What is Pipeline, and Why are we using a pipeline?
In Jenkins, a Pipeline is a powerful feature that allows you to define and manage your CI/CD workflows as code. It provides a way to express your entire build, test, and deployment process in a script-like format, giving you complete control and visibility over every step.
The primary objective of using a Pipeline in Jenkins is to bring structure, automation, and reusability to your CI/CD workflows.
And here’s why we use a Jenkins Pipeline:
Structured and Declarative: A Pipeline lets you define your CI/CD process in a structured and declarative manner. You can specify stages, steps, and conditions, making it easy to understand and maintain the workflow. This clarity helps ensure consistent and reproducible builds across different environments.
Automation and Efficiency: With a Pipeline, you automate your entire CI/CD process, from building and testing to deploying your Flutter app. Once defined, the Pipeline can be triggered automatically, eliminating manual intervention and reducing the risk of errors. This automation increases efficiency, saves time, and enables faster delivery of your app updates.
Version Control and Collaboration: By writing your Pipeline as code, you can store it in version control alongside your app’s source code. This practice ensures that CI/CD process changes are tracked, reviewed, and documented. It also promotes collaboration among team members, allowing them to contribute and improve the Pipeline over time.
Reusability and Modularity: Pipelines promote reusability and modularity by enabling you to define functions, templates, and libraries. This means you can create reusable building blocks for common tasks, reducing duplication and improving maintenance. It also allows teams to share and adopt best practices across different projects.
Visibility and Traceability: A Pipeline provides a clear and visual representation of your CI/CD process. You can easily monitor the progress of each stage, view logs, and track the status of your builds. This visibility helps identify issues, investigate failures, and gain insights into the overall health of your CI/CD pipeline.
How to Jenkins into your Flutter Development?
Step: 1 Install Jenkins in MAC– command
# for the latest version
Install the latest LTS version: brew install jenkins-lts
# For the specific version
Install a specific LTS version: brew install jenkins-lts@YOUR_VERSION
#start Jenkins
Start the Jenkins service: brew services start jenkins-lts
For Windows, You can refer: https://www.jenkins.io/doc/book/installing/windows/
For Linux, You can refer: https://www.jenkins.io/doc/book/installing/linux/
Step: 2 Generate ssh private and public key
to enter the private key first, you have to generate a private key and a public key in your mac
command: ssh-keygen -t rsa -b 4096 -C [email protected]
—-> It will generate a private key and a public key

— Add that public key to the GitHub account
1. GitHub profile –> settings –> SHS and GPG key
2. click on the new SSH key in the ssh key section
3. give it a title of your choice and make the key type Authentication type and copy that public key in key sections
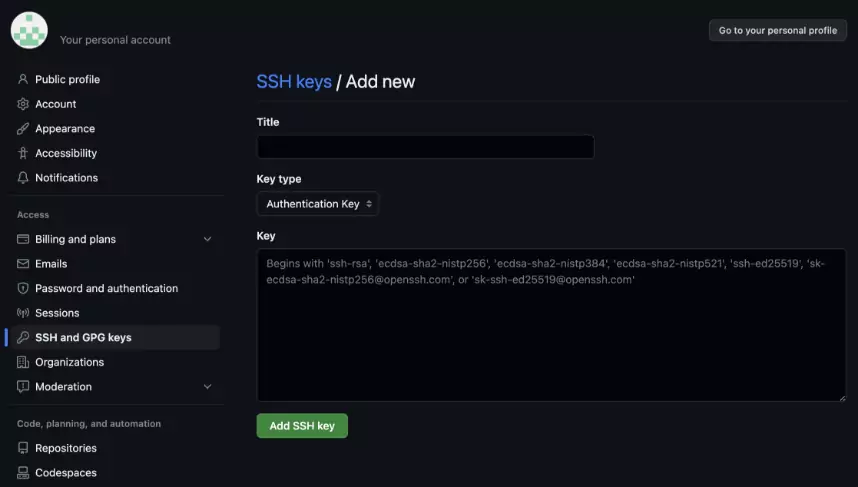
for more information – click here
Step : 3 Configure Jenkins
- Go to manage jenkins –> System Configuration –> manage plugin and download and install appcenter plugin
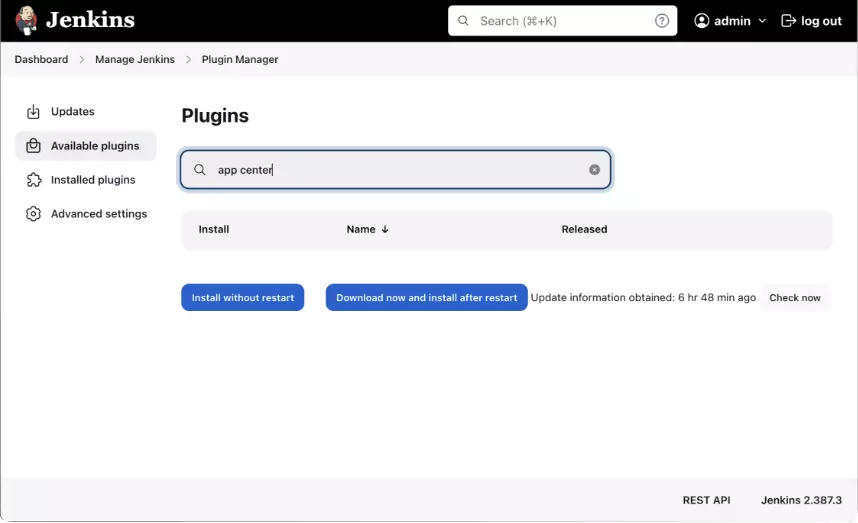
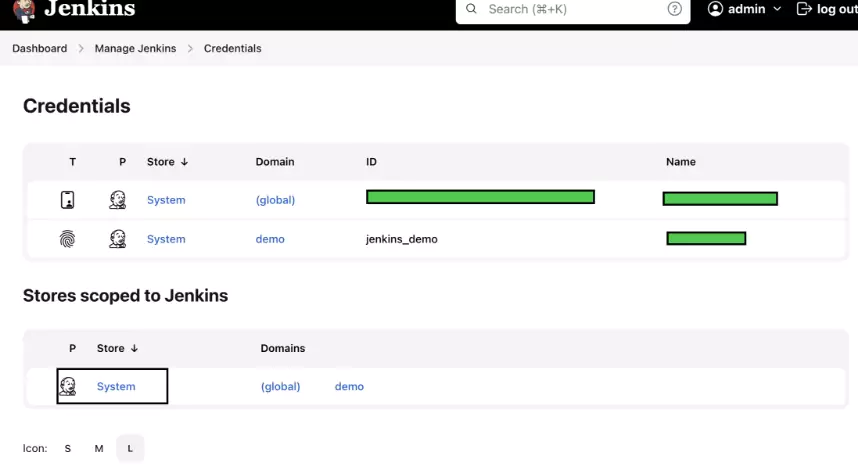
- After That manage jenkins –> Security –> Credential –> Stores scoped to Jenkins –> system and add domain give a name to it and click create.
- Here, for example, I am creating a demo domain.
- And then click on the demo domain.
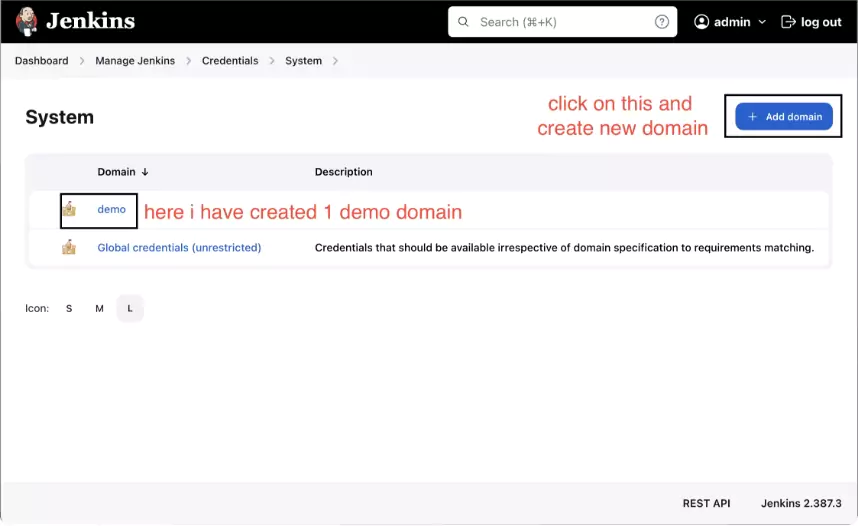
- Click on Add credential and fill details as shown below:
- Kind: SSH username with the private key
- Id: id_name (you can give a name of your choice)
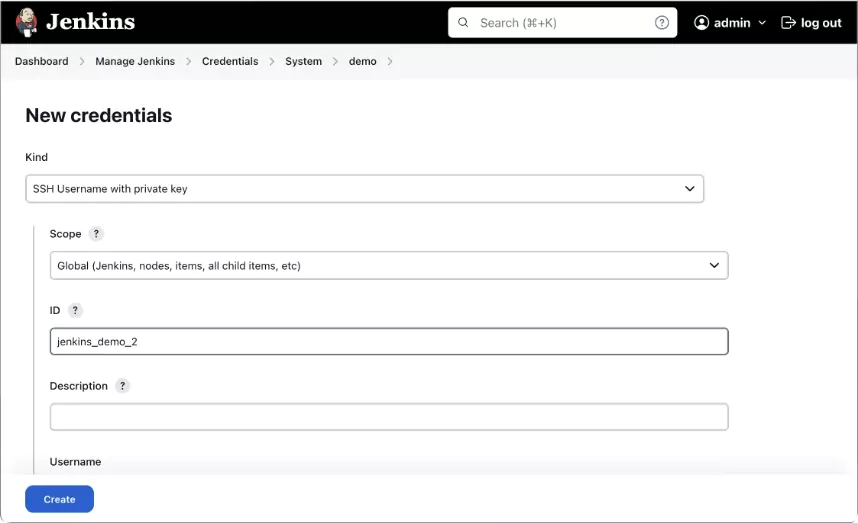
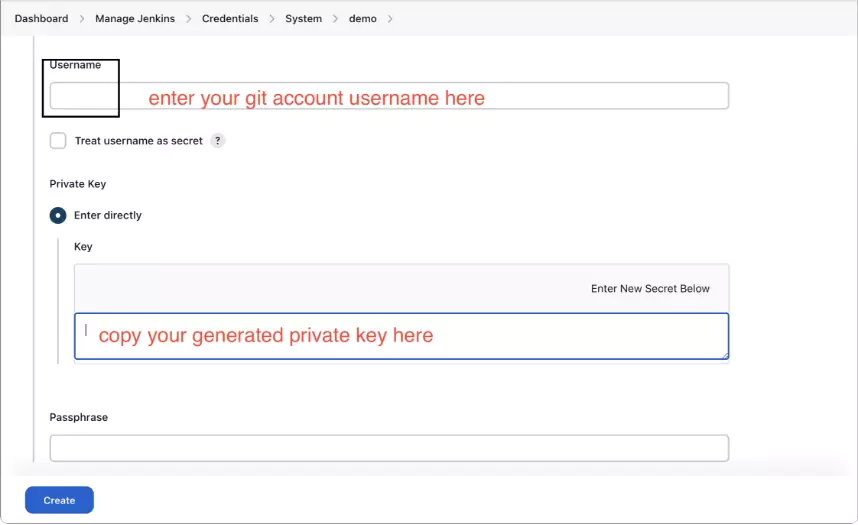
- Username: give your git username
- Private key: select enter directly :
- Copy the private key which we have generated in (step: 2)
Step: 4 Create a new pipeline item and configure the system
- Edit your details in the below pipeline script and put it in a pipeline script section.
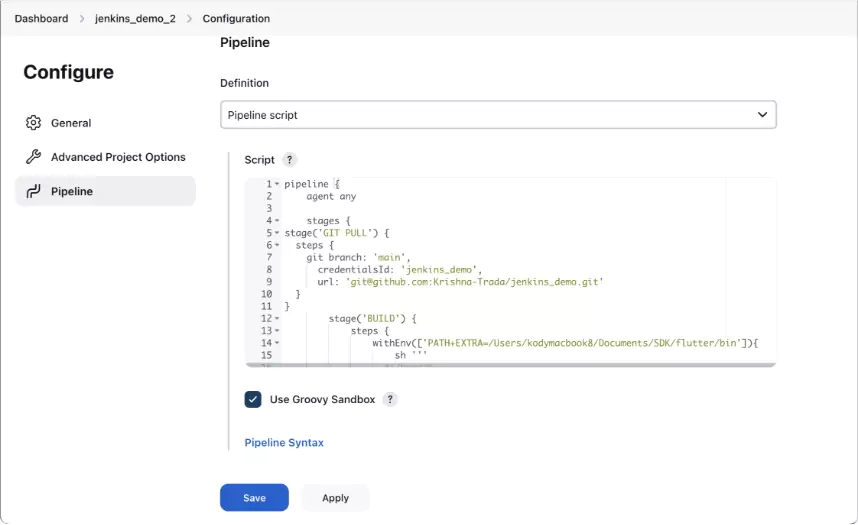
pipeline {
    agent any

    stages {
stage('GIT PULL') {
  steps {
    git branch: 'main',
      credentialsId: 'jenkins_demo',
      url: '[email protected]:User-name/jenkins_demo.git'
  }
}
        stage('BUILD') {
            steps {
                withEnv(['PATH+EXTRA=/Users/kodymacbook8/Documents/SDK/flutter/bin']){
                    sh '''
                  #!/bin/sh
                  flutter build apk --debug
                  '''
                }
            }
        }
        stage('DISTRIBUTE') {
            steps {
                appCenter apiToken: '92be4a6129ab5958d5e6518a5317de16b7a779ce',
                        ownerName: 'projects_test',
                        appName: 'Jenkins-Demo',
                        pathToApp: 'build/app/outputs/flutter-apk/app-debug.apk',
                        distributionGroups: 'tester'
            }
        }
    }
}
Another way to generate credential ID for GitHub:
- This will only help log in using GitHub ID and Password.
- In this login method, there will not be any type of public or private key.
credential –> global –> add credential
Kind: username with password
Username: git username
Password: git password
Id: it will be autogenerated
——-> copy that in pipeline code GitHub stage in credential Id

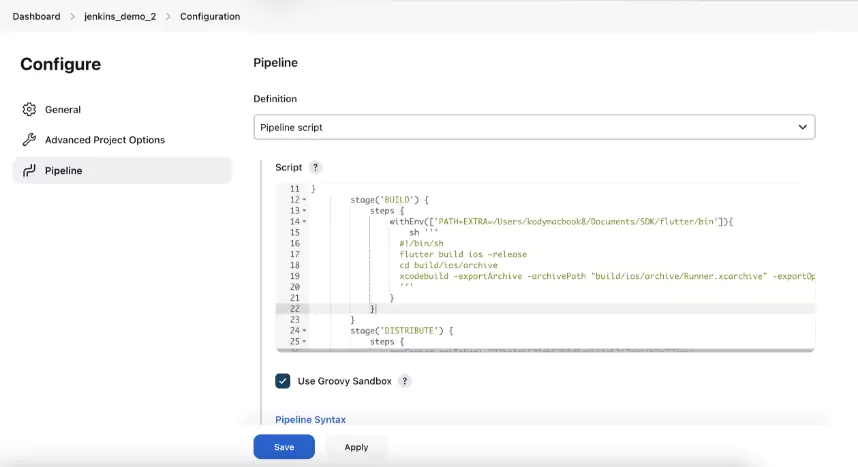
#For iOS
For iOS All Steps will be the same only the pipeline script will change
Note: Before running this please make sure that you have the proper environment and you have all the certificate set which is required to build an iOS app.
pipeline {
    agent any

    stages {
stage('GIT PULL') {
  steps {
    git branch: 'main',
      credentialsId: 'jenkins_demo',
      url: '[email protected]:User-name/jenkins_demo.git'
  }
}
        stage('BUILD') {
            steps {
                withEnv(['PATH+EXTRA=/Users/kodymacbook8/Documents/SDK/flutter/bin']){
                    sh '''
                  #!/bin/sh
                  flutter build ios –release
    	   cd build/ios/archive
    	   xcodebuild -exportArchive -archivePath "build/ios/archive/Runner.xcarchive" -exportOptionsPlist exportOptions.plist -exportPath "build/app/outputs/flutter-apk/"
                  '''
                }
            }
        }
        stage('DISTRIBUTE') {
            steps {
                appCenter apiToken: '92be4a6129ab5958d5e6518a5317de16b7a779ce',
                        ownerName: 'projects_test',
                        appName: 'Jenkins-Demo',
                        pathToApp: 'build/app/outputs/flutter-apk/app-debug.apk',
                        distributionGroups: 'tester'
            }
        }
    }
}
Make your Flutter app development lighting fast!
Jenkins and its powerful Pipeline feature offer a game-changing solution for Flutter developers seeking to streamline their CI/CD workflows. By harnessing the flexibility, automation, and reusability provided by Pipelines, you can create structured, efficient, and scalable processes.
With our dedicated development team and Jenkins, you can conquer the challenges of building, testing, and deploying Flutter apps. High-quality releases with speed and confidence will be a by-product.
So, embrace Jenkins and unlock the full potential of CI/CD with our Flutter app development company!






 Contact Information